Upgrading Main firmware for D series display
- Download the latest main micom firmware
- Unzip the file and copy the root folder and image folder onto the root of the USB stick: (USB Drive):\(T-GFSLDDWWC)\image
- (USB stick can be in NTFS or FAT32 format)
- Plug the USB into the LFD USB port
- Turn the LFD on and select another input, such as DVI
- Go to Support > Software Update > Update Now.
After launching REACH Server, the application will show a window asking for the model and mode selection. The application starts with the utility to create new clone files, thus other utilities can be called from the file menu. To create new files, users may follow the following steps.
- Select year, series, region, model no. from the drop down boxes. If you don’t know the correct information for any option, select ‘All’.
- Selecting year, region, series and type will filter out the models in model no. dropdown box
- Select the correct TV model from the dropdown box in front of the ‘Model’ option.
- After selecting the model number, S/W name of the model will show in the software name box.
- Click proceed to continue with update
- Download latest (correct) firmware file.
- Unzip the firmware file and copy the file to a FAT32 USB drive
- Delete any text following the _ in the folder name (eg. Remove _SECUSB)
- Enter the display men by sequentially pressing ‘Mute’ ‘1’ ‘1’ ‘9’ ‘Enter’ using the remote control
- In the Hospitality menu, enter the ‘Service’ and activate the ‘SW Upgrade’ option
- Once the upgrade is complete, press the red button on the remote control to check the firmware version, show at the bottom of the main interface, matches that of the update file you used.
* Request the latest f/w for your TV using the request form on our website: http://dssceurope.com/online-support/request-consultation
- Connect HTV to Sirch device via Coax (RF)
- Turn on HTV
- In Hospitality menu (mute911enter) Factory Reset (just in case)
- Set mode to Standalone
- Enable Reach Solution/Reach 3.0 and Immediate Update
- Go to Channel and start a channel scan to find the Sirch server broadcast (Cable, Full)
- Deploy a project in Reach and wait for the HTV to get the signal
- Check signal strenght in the Hospitality Menu (System/Self Diagnosis for TV, Signal Strength) or measure it manually
- Coax cable is connected correctly
- Hospitality Menu -> Channel -> Channel Setup (Aerial Cable) -> Auto Tuning -> Aerial – Cable, Channel Type – Digital, Scan Mode – Full -> Scan, should find Hotel TV channel from Reach server
- Check settings on Sirch server on Reach 3.0/Modulator:
defaults: DVB-C, Freq: 802000, Channel: 87, Symbol Rate: 6875000, Cons: QAM64, No update stream!, status playing!
- Log in to MI server
- Go to Device
- Select S/W update
- Select View Software reg. & Deployment
- Select Register
- Choose the correct player type (I player or S Player)
- Create a software name
- Browse to the software file. (should be a .zip file containing only image and text file). This file MUST be named image.zip
- OK
- Select Deploy
- Choose whether to play now, or schedule
- Select the applied version, meaning the current firmware versions
- Choose to update either by model, or by device group
- OK
This will now update the firmware of your display or displays, it can take some time, so do not turn the displays off before they reboot.
- Log in to your MagicInfo server, using an administrator id
- Select Content
- Select Add – Local
- Watch for a pop up, this may be blocked by your browser settings
- Click on the device name
- Select Current Status
- Once loaded, select timer set, edit
- Activate both on and off timer
- Enter the correct time and daily settings
- Ensure you select the correct input source, especially if you are using MagicInfo source
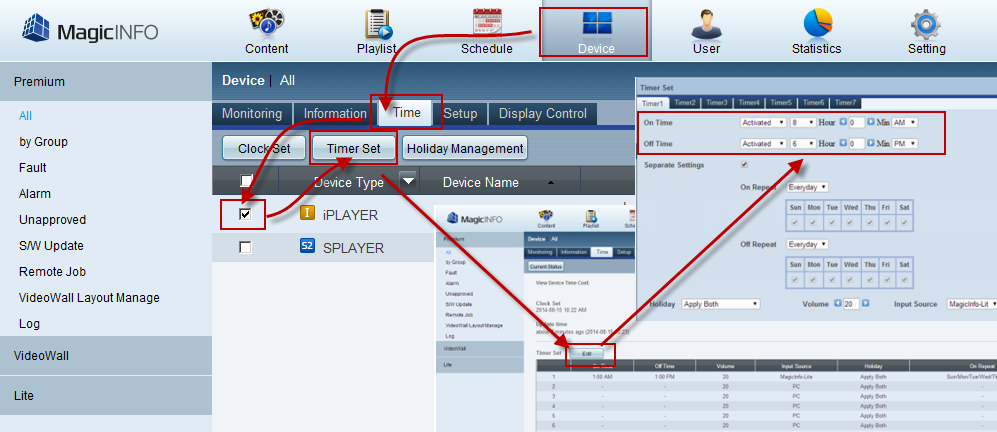
- Log in to your MagicInfo server, using an administrator id
- Select Device
- Select Time
- Click on the device name
- Select Current Status
- Once loaded, select timer set, edit
- Activate both on and off timer
- Enter the correct time and daily settings
- Ensure you select the correct input source, especially if you are using MagicInfo source
Requirements: MagicInfo server v2004.7 upwards
Samsung LFD (large format display) compatible with either Lite, I,S or S2 player
Access to both display and server settings.
- Ensure your device is connected to the same network as your MagicInfo server
- Using the remote control, enter the On Screen Display menu
- Enter Network settings
- Enter Server Network Settings
- Select Connect to Server and enter the correct information including any IP, port and SSL information if required.
- Log in to your MagicInfo Server using Admin account information
- Select Device
- Ensure you are using the correct MagicInfo Player
- Select Unapproved
- You will be able to see any devices that are pointed at the Sever IP address in this list, select the correct display, ensure it is correct using the IP address displayed.
- Select ‘Approval’
- Enter any information required
- You MUST enter a device group, although this can be moved to another group at any point
- Select OK
- Select All devices
- You will now see your connected display